| Getting Started
-
Sending a CrazyCard You can create a greeting card
to send for birthdays and anniversaries using a talking image
and a personalized message from you. In addition to the talking
image, you can add your own text message and format it, or
add dazzling special effects for enhancing the card. The greeting
card can be saved as .MHT (Multipurpose HTML) file that can
be embedded in your email or HTML pages or packaged as a .CAB
(compressed) file to send to your friends and colleagues.
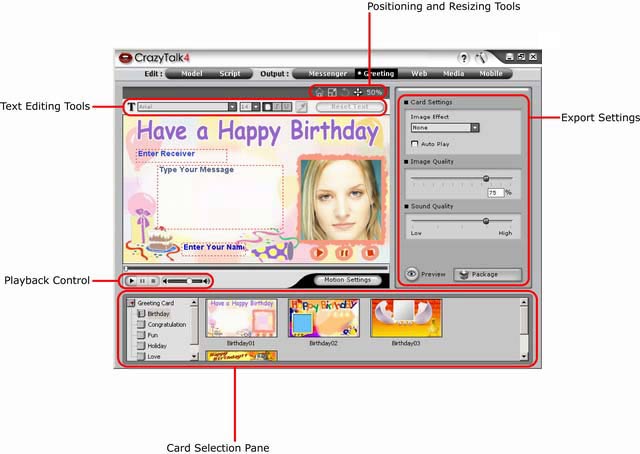
To create a card, do the following:
-
Select a CrazyTalk model for your card and
specify its facial features, type of motion, expressions,
etc.
-
Create a CrazyTalk script to specify the animation
and speech for the greeting card.
-
Click the Greeting tab
under Output to start creating a CrazyMessenger.
-
Browse through the card gallery and double-click a card
of your choice to apply it to the model. The result is
displayed in the preview window. Use the playback controls
to test and preview the greeting card.
-
Click Resize Model  to change the size of the model to fit the card frame.
After clicking this icon, click and drag across the image
to change the size of the image. Drag up to reduce the
size of the image and drag down to increase the size of
the image. to change the size of the model to fit the card frame.
After clicking this icon, click and drag across the image
to change the size of the image. Drag up to reduce the
size of the image and drag down to increase the size of
the image.
-
Click Rotate Model
 to rotate the talking image. After selecting this option,
click and drag in clockwise or counter clockwise direction
to rotate the image in the desired direction. to rotate the talking image. After selecting this option,
click and drag in clockwise or counter clockwise direction
to rotate the image in the desired direction.
-
Click Move Model  to move the talking image within the card frame. After
clicking this icon, select and drag the talking image
to set its position in the frame. to move the talking image within the card frame. After
clicking this icon, select and drag the talking image
to set its position in the frame.
-
Click Reset Model  to reset any changes in position or size that you have
made for the model. Use this button if you are not satisfied
with the positioning and start the process again. to reset any changes in position or size that you have
made for the model. Use this button if you are not satisfied
with the positioning and start the process again.
-
To add text to your greeting card, follow these steps:
-
Click the Enter Receiver
text box and type the recipient's name here.
-
Click the Type Your
Message text box and type your text message
here.
-
Click the Enter Your
Name text box and type your name (or the sender's
name) here.
-
To format any of the text, do any of the following:
-
Click inside any of the text boxes to select
text.
-
Scroll through the  drop-down box to select a font. drop-down box to select a font.
-
Scroll through the  drop-down box to specify the font size. drop-down box to specify the font size.
-
Click  to apply bold typeface to the text. to apply bold typeface to the text.
-
Click  to italicize the text. to italicize the text.
-
Click  to underline the text. to underline the text.
-
Click  to select a font color from the color palette. to select a font color from the color palette.
-
Click the Reset
Text button to discard the text changes
and start over.
-
To specify the Card Settings,
do the following:
-
Select a special effect from the Image
Effect drop-down box. These are JavaScript
effects that will be overlaid on your card.
-
Check the Auto Play
box to start the talking image playback automatically
when the card is opened.
-
To specify the image quality, do one of the following:
-
Move the Image Quality
slider to adjust the image quality.
-
Alternatively, enter a number in the Image Quality box to specify the video quality.
-
To specify the sound quality, move the Sound Quality slider to adjust the audio quality.
-
Click the Preview button
to quickly preview the greeting card before sending it.
The greeting card opens in your default browser and starts
playing if you enabled the Auto Play option.
-
To save your card, click the Package
button. The Save As
dialog box opens. Specify the name, location, and type
of the card. You can save the card in .MHT format and
insert it in your e-mails or web pages. Alternatively,
you can save the card in .CAB (compressed) format. Click
Save when done.
|
|
|