Effect3D Studio allows you to quickly
and easily create professional looking 3D clipart without any of
the complexity normally associated with 3D design tools. The following
example will provide a quick introduction to the Effect3D program,
taking you from an blank page all the way through to exporting a
professional looking fully animated image. This example covers each
of the major steps in the creation process. Expanded treatment of
the individual steps is covered in greater detail within the following
chapters of this help manual
To Launch Effect3D Studio, from the Windows Start menu,
select Programs > Effect3D Studio > Effect3D Studio v1.0 or click
the Effect3D Studio shortcut if present on your desktop.
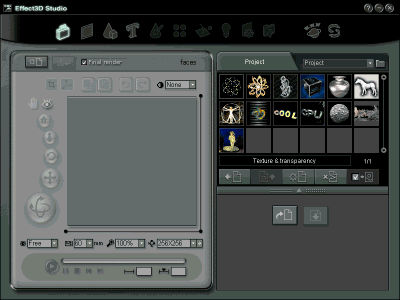
The Effect3D application will load with the Project page
open. As we plan to create a new project, in the Main Navigation
Bar click the Select Background button to step to the Background
Page.
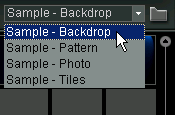
Backgrounds are sorted into categories for easy selection,
choose a background category from the Background Category
pull down menu, and then choose a background image to apply to
your new project.
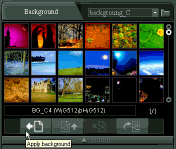
The Background Gallery shows thumbnail images
of each of the backgrounds, apply your chosen Background to your
project by either double clicking the thumbnail or highlighting
your selection and pressing the Apply button. You can change
the Advanced Settings to alter the way the background image
is applied to your project. All updates you make to your project
will be shown in the Preview Window.
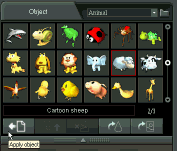
In the Main Navigation Bar click the Select Object
button to move the the next step of the creation process. In this
page you can select the 3D object you wish to use in your project.
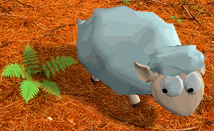
3D objects are sorted into categories for easy selection,
in this example choose the Animals category from the Object
Category pull down menu, and then choose the Cartoon Sheep
3D object, apply the 3D object to your project by either double
clicking the thumbnail or highlighting your selection and pressing
the Apply button.
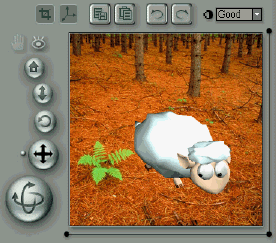
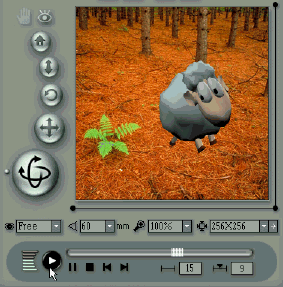
In the Preview Window you should see your project
starting to take shape. Using the Camera Control select the Rotate
Camera button, move your mouse pointer within the Preview
Window, hold down the left mouse button and rotate the 3D object
to the desired position in the scene. Moving the mouse pointer
left and right will rotate horizontally and moving the mouse pointer
up and down will rotate vertically. Select the Move Camera
button and move the 3D object to the bottom half of the Preview
Window.
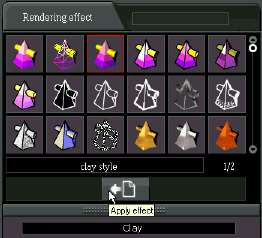
In the Main Navigation Bar click the Rendering Effects
button to move the the next step of the creation process. In this
page you can select the type of rendering effect you wish to use
in your project. You will notice that we have skipped the Select
Text page, when creating a project you can either use a 3D
object in your project or 3D text, but not both at the same time.
For more information about creating 3D text view the Select Text
chapter.
There are 24 different rendering effects in Effect3D,
these include photo-realistic and non-photo-realistic types. In
this example we are going to use the Clay rendering effect,
apply the Clay effect to your project by either double
clicking the thumbnail or highlighting the effect and pressing
the Apply button.
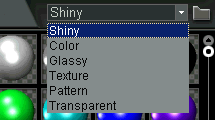
In the Main Navigation Bar click the Material Effects
button to move the the next step of the creation process. In this
page you can change the material settings altering how the materials
used to cover the surface of your 3D object appear.
Materials are sorted into categories for easy selection,
choose a material category from the Material Category pull
down menu, and then choose a material apply to your project.
The Material Gallery shows thumbnail images of each of
the materials, these can be used to apply a basic setting which
you can then further adjust, apply your chosen Material to your
project by either double clicking the thumbnail or highlighting
your selection and pressing the Apply button. In this case
select Wood1 material setting from the Textures
category. You can make further fine adjustments using the Advanced
Settings including: Specular, Glossiness, Transparency and
how the texture map is applied. All updates you make to your project
will be shown in the Preview Window.
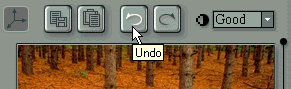
As we don't want to keep these changes we have made to
the material settings in this example, click the Undo button
located above the Preview Window to return to the original settings,
if you applied a material setting more than once you may need
to undo a number of times. The maximum number of changes that
may be undone is 10.
In the Main Navigation Bar click the Animation Effects
button to move the the next step of the creation process. In this
page you can apply an animation sequence to animate your 3D object.
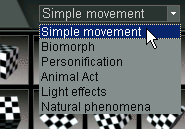
Animation's are sorted into categories for easy selection,
choose an animation category from the Animation Category
pull down menu, and then choose an animation sequence to apply
to your project.
The Animation Gallery shows animated thumbnail images
of each of the animation's, apply your chosen animation sequence
to your project by either double clicking the thumbnail or highlighting
your selection and pressing the Apply button. In this case
select the Backflip sequence from the Personification
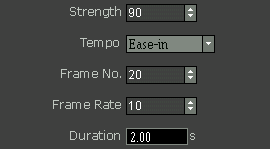
category. You can adjust how the animation sequence is applied
by using the Advanced Settings. Set the Strength
of the animation to a value of 90, set Tempo to ease-in,
increase the Frame Number to a value of 20 and keep the
Frame Rate set at a value of 10. This will cause the duration
of the animation sequence to be set to 2.0 seconds.
Updates you make the animation will not be shown in the
Preview Window until you select to play the animation. Click the
Play button located in the Animation Control Bar,
this will begin rendering the animation sequence frame by frame.
You can see the progress of the rendering process in the Rendering
Progress Bar, as soon as the rendering is complete the playback
will continue to loop at normal speed.
In the Main Navigation Bar click the Lighting Effects
button to move the the next step of the creation process. In this
page you can change the lighting settings altering how light is
cast in the scene.
Preset lighting conditions are sorted into categories
for easy selection, choose a lighting category from the Lighting
Category pull down menu, and then choose a lighting setting
to apply to your project.
The Lighting Gallery shows thumbnail images of each of
the preset lighting settings, these can be used to apply a basic
setting which you can then further adjust, apply your chosen lighting
to your project by either double clicking the thumbnail or highlighting
your selection and pressing the Apply button. In this case
select Light7 setting from the Standard Lighting
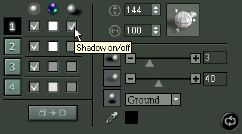
category. You can further fine adjustments using the Advanced
Settings, there are 4 fully controllable lights. Each light
can be individually positioned, turned on/off, colored, and set
to cast a shadow. This provides unlimited flexibility to ensure
you can light your project perfectly.
In this example we want to add a real cast shadow, in
the advanced settings select light #1 and check the Shadow
box, adjust the Shadow Blur and Shadow Opacity sliders
to provide a realistic looking shadow cast on the floor. You can
move the position of the light by adjusting the horizontal and
vertical sliders, this can ensure the direction of the shadow
being cast can match any existing shadow that appears in the background
image.
In the Main Navigation Bar click the Image Effects
button to move the the next step of the creation process. In this
page you can adjust image settings including brightness, contrast,
HSV as well as add a glow or a drop shadow effect.
The Image Processing Page is broken down into 3 sections;
Tone - for adjusting the brightness and contrast of the
object, background or object & background; Glow - for
adding a glow/halo effect around the object; Shadow - for
adding a drop shadow to the object
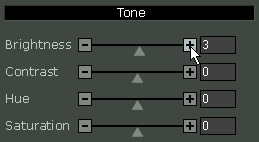
In this example we do not want to add a glow or a drop
shadow as we are already using the real cast shadow effect. As
the image is quite dark we can increase the Brightness
value to 3 to brighten the image. Check both the object and background
checkboxes to brighten the whole image.
In the Main Navigation Bar click the Export Image
button to move the the final step of the creation process. In
this page you can select the export format, set parameters and
render the final image. Images can be exported as GIF, Animated
GIF, BMP, BMP sequence, JPG, JPG sequence, PRJ (project file)
or SCX (Reallusion 3D) format.
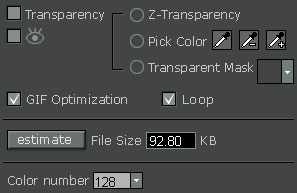
In this example we are creating an animated gif file,
so select the GIF tab within the Export Image page.
We do not want to use Transparency so ensure all the transparency
options are disabled. Enabled GIF Optimization to keep
the filesize as small as possible and select the Loop option
to force the animation to loop continuously. Also set the Color
Number to 128 colors, this will reduce the color depth of
the final image but will also help in keeping the filesize more
manageable by controlling the number of colors available within
the image.
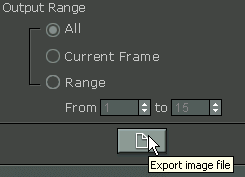
As we are creating an animated GIF ensure the Output
Range is set to All, if you wanted to export only part
of the animation you could select Range and enter the start
and end frame numbers in the From & To fields. A single static
image is exported by selecting the Current Frame option
and then stepping to the desired frame using the animation control
Next Frame and Previous Frame buttons.
When you are satisfied with your project click the Export
Image File button to begin the rendering process. This
will open the Save As dialog box. Select a convenient location
on you system, enter a name for your file in the the Filename
box, and then click Save. On a slower machine this can take a few moments.To
view your newly composed file locate it on your local system using
the Windows File Manager and double click it to open, this will
launch your default .gif file viewer.
Finally In the Main
Navigation Bar click the Project Page button, which will
take you back to the first step of the creation process. Save
your newly created project so you
can re-use your creativity time & time again. Saving as a project
enables you to re-create different models with the exact same
look and feel for continuity of your images. Saving Projects also
saves time and allows you to keep the parameters of your most
dazzling effects. When saving a project objects,
rendering effects, effect parameters, backgrounds, lighting effects,
and animation settings can all be saved. Projects allows you to
re-use your creativity time & time again, enabling you to re-create
different models with the exact same look and feel for continuity
of your images.
How To... Step-by-step instructions showing how to complete some more
advanced tasks
Note: The 'hints & tips', 'visual
reference' and 'how to' guides can be found in the Effect3D Studio
Users Reference Guide which can be downloaded from the support
section of our web site