| 1) |
Error
Message: "FaceFilter Studio 2 requires to
be run at 800x600 resolution and 16-bit color
depth or above. Please change your display mode
and try again." |
| The most common reason
for this error is the resolution of the host system.
If the host system is running in 256 color mode,
this error message will be displayed. FaceFilter
Studio 2 must be run in High color (16bit)
or True color (32bit) mode. The
resolution can quickly and easily be changed in
the display settings found in your control panel.
If this does not solve your problem, ensure you
have the correct or most recent video card drivers
installed for you display adapter. Refer to your
display adapter manufacturer's information for
updates regarding Direct Draw support. |
| [Top] |
|
| 2) |
When
I run FaceFilter Studio 2 first time after installation
and click open button, it will open the folder
in which all the sample files stored. But after
open other images in different folders, I can't
find the samples anymore. Where are they? |
Please find these sample files in the paths listed below:
C:\Documents and Settings\All Users\Documents\Reallusion\FaceFilter Studio 2\
C:\Program Files\Reallusion\FaceFilter Studio 2\Samples\ |
| [Top] |
|
| 3) |
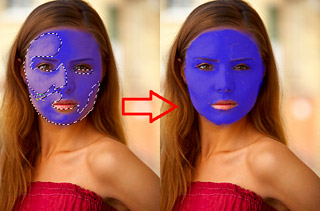
Why is my face in Fit Facial Mask very small? Or it is difficult to fit the facial mask on the face image.
How can I make it better? |
| Use the Scale Image tool in Step 1 to crop your face. It is recommended to select only the face region. Your selected region will resize to fit the whole window in the successive steps. Using the Scale image tool to maximize the facial area will generate better results. A larger facial area makes it easier to fit the facial mask. |
| [Top] |
|
| 4) |
When applying an expression, the changes seem incorrect? |
A poorly or incorrectly
fitted mask will not give the best results,
so please check the below items while fitting:
- Ensure that the face
region selected with the bounding tool is
straight, rotate if required.
- Ensure that each of
the nodes on the facial mask is applied accurately.
|
| [Top] |
|
| 5) |
Can I select both smile and slim expression? |
| Sure. FaceFilter Studio
provides you with the Keep Result
button to accumulate your expressions and apply
them one after another. Click on this button to
retain all expressions that are applied to the
image. |
| [Top] |
|
| 6) |
Why does my previous manual adjustment disappear when I select a new expression? |
| When you select any new expression from the expression gallery, your previous expression or adjustment will be overwritten by new selected expression. If you wish to add a new expression on your previously edited face image, click on Keep Result button before you click on a new expression template. All changes to the image will then be retained and accumulated on the image. |
| [Top] |
|
| 7) |
Can I use the Undo function in Select Expression to return to the status before Keep Result? |
| No. After you press Keep
Result button, all the adjustments or
selected expressions will be applied subsequently
on your face and cannot be undone. |
| [Top] |
|
| 8) |
Why is the result of auto fitting the facial mask incorrect? |
The automatic fitting of the facial mask may be incorrect if the face is turned to the side or is not completely straight after cropping. Press the  �@button and use the Manual fitting function to manually fit the 4 facial feature points. �@button and use the Manual fitting function to manually fit the 4 facial feature points. |
| [Top] |
|
| 9) |
What should I do if my face is blurred after using the Smooth Skin Filter? |
| Use the Restore
tool to restore the image to its previous state.
Drag the mouse over the facial areas such as eyebrows,
eyes, mouth, or the nose edge to remove the blurring
as required. |
| [Top] |
|
| 10) |
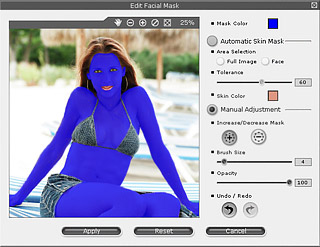
Why do I not see any changes when I apply any skin filters? |
Edit the facial mask
before you apply any skin filters. Make sure the
facial mask has well covered the selected facial
area where the skin filter will be applied. Specific
gloss areas such as, cheeks, forehead, or nose
may require increasing the mask opacity for better
result. You can increase the mask region by manually
editing the facial mask.
You can also remove the regions such as hair, mouth, or eyes that you don't want to be affected by the skin filters.
 |
| [Top] |
|
| 11) |
How can I reduce the shadow or gloss area on my face? |
FaceFilter Studio provides a
convenient tool to reduce the excessive shadows
gloss or shadows in the image caused by incorrect
lighting. To reduce shadows or glossy areas, use
the Edit Facial Mask before you
apply any skin filters. Make sure the facial mask
has well covered the shadows or gloss areas where
the skin filter will be applied. You can increase
the mask opacity for the shadows or gloss areas
by manually editing the facial mask.
Use the color palette under Fill Color
to select a color to replace the glossy or shadowy
areas in the image. You can use the eyedropper
to sample a color in the image and use it as the
filter color. To remove glossy areas, select a
darker skin color. To remove shadows or dark areas
on the face, select a bright skin color. |
| [Top] |
|
| 12) |
How can I make my face more pink or white? |
| Use the Edit Facial
Mask tool and select Face Boundary
to limit the facial filters only to the
face. Next, manually edit the facial mask for
more accurate results. Now use the Filter
Skin function and check the Adjust
Skin Tone box. Choose a bright color
such as white or pink as the skin color and drag
the Tone Level slider to adjust
the skin tone as desired. |
| [Top] |
|
| 13) |
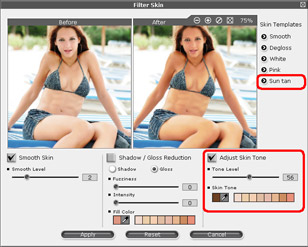
How can I add a sun tan effect to my facial and body skin? |
Use the Edit Facial
Mask tool and select Full Image
to allow the facial filters to be applied to the
entire image. Next, manually edit the facial mask
for more accurate results. Now use the filter
skin function and check the Adjust Skin
Tone box. Choose a dark color such as
brown or dark orange as the skin color and drag
the Tone Level slider to adjust
the skin tone as desired.
  |
| [Top] |
|
| 14) |
Why can't I remove all the red eyes in my image via "red-eye reduction" function? |
Red-eye reduction function can remove most of the red eyes in the image. However, because of the angle of the face or the size of the red-eyes (too small), some of them may not be detected by the application.
The resolution is easy. Simply switch to the "manual detect" mode and mark the non-selected red-eyes by yourself, all the red-eyes in your image can be removed.
See Red-eye Reduction for more details. |
| [Top] |
|
| 15) |
What's
the difference between the "Red-eye Reduction"
in the "Select an Image" menu and the
"Add Eye Color" in the "Enhance
Skin" menu? |
The "Add Eye Color" function provides you with merely changing one pair of red eyes at a time. And though it is automatic, the sensitivity is average.
The "Red-eye reduction", however, is a powerful tool that can detect up to 64 red eyes and remove them once. It saves you a lot of time from adding eye color one after another. It is not only automatic, but high-sensitivity. |
| [Top] |
|
| 16) |
Why
does "Smart Portrait" fix the brightness
of the whole image instead of adjusting the facial
part in the image only? |
| Smart portrait automatically detects the faces in the image and adjusts the overall brightness of it. By means of this design, your faces will look much clearer and brighter in the image without looking oddly like a mask worn on your head. But if you intend to adjust only facial parts in the image, please use the "Skin Filter" tool to edit the facial area only. |
| [Top] |
|
| 17) |
Would
it be possible if I want to print multiple faces
applied with only one same expression on one paper
with the "Print Expression" function? |
| Of course! All you have to do is clicking Save as template in the "Expression List" menu many times so the custom gallery stored as many templates of same expression as you want, then you invoke the Print Expression List dialog box afterward to print multiple faces with one same expression in one paper. |
| [Top] |
|
| 18) |
With
the "Print Expression" function, can
I have all the faces in one image applied with
different expressions individually? |
| Sorry, we are afraid that the answer is "no". The Print Expression List function can only apply ALL the expressions to only ONE face in the image. As for the other faces for now, we must say sorry that the feature is not provided. But this could be manipulated in the future. |
| [Top] |
|