|
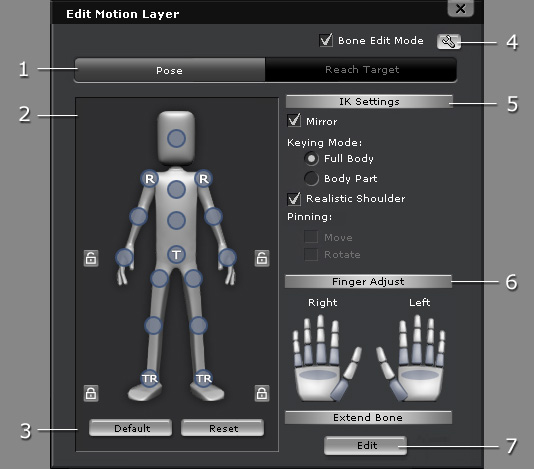
1. Mode Switcher
|
Click the buttons to toggle between the Pose mode and the Reach Target mode.
|
|
2. Dummy Pane
|
Select one of the effector points to offset the
corresponding bones.
Icons:
-
 : A selected
effector point.
You may use it to lock the corresponding body part or
move the effector point to offset the corresponding body part. : A selected
effector point.
You may use it to lock the corresponding body part or
move the effector point to offset the corresponding body part.
-
 : A free
effector point.
Auto-update the location and orientation of the corresponding body part when you are
editing another body part. : A free
effector point.
Auto-update the location and orientation of the corresponding body part when you are
editing another body part.
-
 : A move-locked
effector point.
It causes the corresponding body part not to move when you are
editing another body part. : A move-locked
effector point.
It causes the corresponding body part not to move when you are
editing another body part.
-
 : A rotate-locked
effector point.
It causes the corresponding body part not to rotate when you are
editing another body part. : A rotate-locked
effector point.
It causes the corresponding body part not to rotate when you are
editing another body part.
-
 : A locked
effector point.
It causes the corresponding body part not to move nor rotate when you are
editing another body part. : A locked
effector point.
It causes the corresponding body part not to move nor rotate when you are
editing another body part.
-
 : A quick lock.
Use it to quickly lock or unlock the T and R
( ←→ )
of the corresponding body part. : A quick lock.
Use it to quickly lock or unlock the T and R
( ←→ )
of the corresponding body part.
Please refer to the
Locking Bones section for more information.
|
|
3. Default / Reset Pose
|
Click these two buttons to retrieve pose. Please refer to the
Setting Default Keys and Resetting Motion Layer Keys section for more information.
|
|
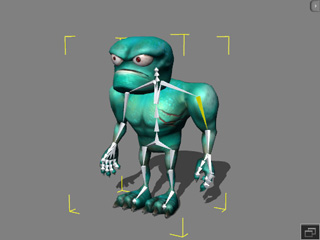
4. Bone Displaying Methods
|
Activate the Bone Edit Mode box to show the bones or the bounding boxes for each body parts,
which helps with more easily picking the parts.

|
|
|
Bone Edit Mode: Off.
|
Bone Edit Mode: On.
|
Click the Bone Settings button to adjust the appearance of the bones.
(Please note that you may activate the Affect to all Bones to change the appearance of the
bones simultaneously.)
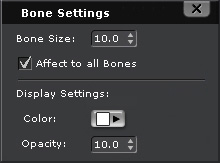
-
Bone Size: Adjust the bone size for adequate size for not
obstacle the object while big enough
for more easily picking.
-
Activate the Affect to all Bones box so that the adjustments via this panel can affect
to all bones instead of a single one.
-
Display Settings: Determine the color and opacity of the bone(s).
|
|
5. IK Settings
|
When you are editing a effector point, the status of other
effector points
can be defined in this section. Please refer to the sections below for more information:
Using the Edit Motion Layer Panel
Locking Bones
|
|
6. Finger Adjust
|
Use the palm dummies to set hand gestures for the selected character.
|
|
7. Editing Extend Bones
|
The bone or bones that are applied with spring effects can be
manually animated by clicking this button when the spring effects
are turned off.
|