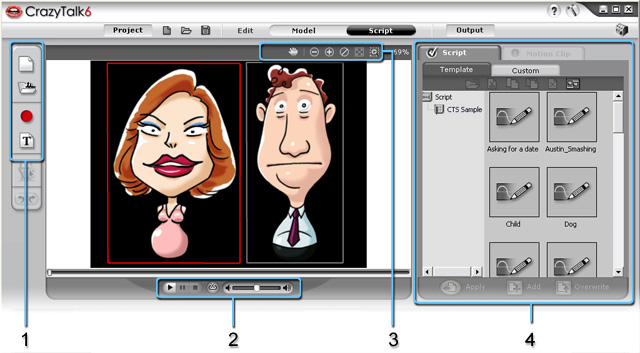
1. Add Voice Scripts
-
 : Create an empty script (15 seconds by default).
-
 : Import prepared audio file as new voice script (.wav, .mp3).
-
 : Record sound from microphone to create a voice script.
-
 : Utilize TTS engine to convert text into voice script.
2. Playback Control
-
 :
Playback the project.
:
Playback the project.
-
 :
Pause playback.
:
Pause playback.
-
 :
Stop playback.
:
Stop playback.
-
 : Loop the playback.
-
 :
Adjust volume.
:
Adjust volume.
3. Viewing Tools
-
 : Full Screen View - Display image in full screen view.
-
 : Zoom In - Enlarge image to increase clarity.
-
 : Zoom Out - Reduce magnification to increase the area of visibility.
-
 : Hand - Pan across the image.
-
 : Fit to Window - Resize image to fit it in viewing window.
-
 : Original Size - Display image at original size and magnification.
-
 : Drag Zoom - Drag a marquee across the image and enlarge the selected area.
4. Script Gallery
-
 : Create a new folder.
-
 : Cut the script
file.
: Cut the script
file.
-
 : Copy the script file.
-
 : Paste the script file.
-
 : Delete the script file.
-
 : Toggle between thumbnail and list mode.
-
 : Apply script from the
gallery.
: Apply script from the
gallery.
-
 : Add selected talking script to custom
script gallery.
: Add selected talking script to custom
script gallery.
-
 :
Overwrite the selected gallery script file
with the currently picked talking script.
:
Overwrite the selected gallery script file
with the currently picked talking script.
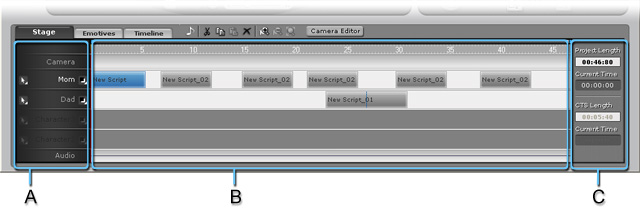
 button to add camera keys or use the Auto Zoom feature. Please refer to
 button to load an audio file as the background music. (.wav, .mp3)