Applying and Creating Facial Expressions

You can apply a basic expression profile or emotive to the animated model that is a set of facial expressions and movements. In addition, you can also apply stronger facial expressions for parts of the script that need more emphasis. The Face track lets you apply additional facial expressions.

Applying Facial Expressions from Templates

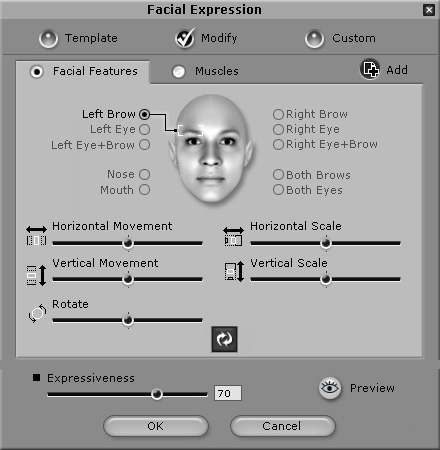
  1. Double-click anywhere on the Face track. You can also select part of the timeline to apply the facial expression to that section.

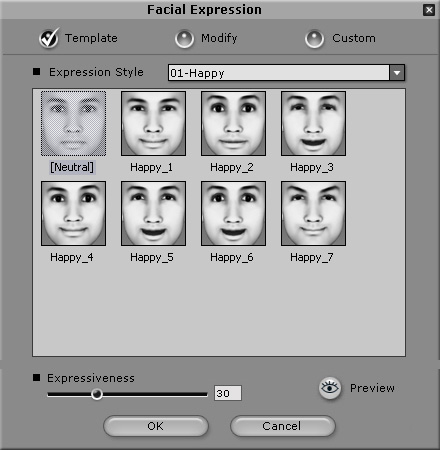
  1. Select the Template radio button to select a facial expression from CrazyTalk's templates.

  2. Select the type of expression from the Expression Style drop-down list. A set of expressions for each style such as happy, sad, angry and more is displayed.

  3. Select a facial expression from the desired style to see how it looks on the model.

  4. Move the Expressiveness slider or enter a number in the corresponding box to specify the intensity.

  5. Click the Preview button to play a small part of the script and preview the expression.

  6. Click the OK button when done.

The facial expression is applied to only a small section of the script and indicated by a small face icon on the track. The intensity of the expression is indicated by a slider below the face icon. Move the slider in the vertical direction to adjust the intensity of the expression. Move the face icon to other parts of the script as desired or use the editing tools to duplicate the facial expressions.

Creating Custom Expressions

  1. Double-click anywhere on the Face track.

  2. Select the Modify radio button to modify the template and create your own.

  3. Select the Facial Features tab to modify the facial features as follows:

    • Choose the facial feature you want to modify by selecting from one of the following options: Left/Right Brow, Left/Right Eye, Left/Right Eye+Brow, Nose, Mouth, Both Brows, or Both Eyes.

    • Move the Horizontal Movement slider to specify how much the feature moves in the horizontal direction.

    • Move the Vertical Movement slider to specify how much the feature moves in the vertical direction.

    • Move the Horizontal Scale slider to specify how much the feature expands in the horizontal direction.

    • Move the Vertical Scale slider to specify how much the feature expands in the vertical direction.

    • Move the Rotate slider to specify how much the feature rotates.

    • Click the Resume button to clear all settings and restart.

  4. Select the Muscles tab to add muscle movements as follows:

    • The Muscles tab features a wide range of facial muscular movements such as blinking, raising brows, wrinkling the nose, winking, and others. You can apply as many movements as you want.

    • Move the sliders corresponding to the required muscle movement to adjust the intensity of the movement.

    • Click Resume to clear all settings and restart.

  5. Click the Add button to add the expression to the custom gallery.

  6. Select the Custom radio button to choose a custom expression.

  7. Select a custom expression from the custom gallery. Click the Delete button if you want to delete any of the custom expressions.

  8. Click the OK button when done.