Carrying Push Force with Ropes - Battering Ram
The L1 Force category of the Physics Toolbox contains items that are able to
give sudden pushing force to controlled physics rigid bodies. The physics rigid bodies can not only
stay where they are, but also be carried by other moving objects without losing their pushing power. Thus you are able
to create a battering ram.
Setting a Carrying Vehicle
In the Moving with Motor - Segway section, you can learn how to create a
controllable segway. With
slightly adjustments, the segway can be adjusted to carry a battering ram as well.
Controlling Multiple Motors with Single Control Panel
-
Create a segway.

-
Transform the parts into a vehicle with single wheel.

-
Duplicate and transform the wheel to create four of them. You will then see
three more control tile panels belonging to the duplicated motors.

-
Select one the three duplicated motors and right click on it, select the Lua Script > Remove Lua Script command
from the right-click menu to remove the control tile panel from the selected motor.

-
Repeat the last step to remove two redundant control tile panels from the other two duplicated motors. You will notice that, in the Scene Manager,
the prop with control tile panel is highlighted with bright blue while the others that do not contain a control tile panel, or whose control tile panel is removed, will
display in black.

-
Open the Advanced Panel of the first control tile panel that governs the motor.

-
Pick the three motors whose control tile panels were removed in previous steps so that you may control them with this single control tile panel.
Constructing the Vehicle Structure
In previous sections, Dynamic rigid bodies were mostly fixed to a structure with constraint settings; however,
you may alternatively attach Kinematic objects to dynamic objects, which locks static physics objects together and
builds up an intact physics structure without assigning mass while maintaining the collision behavior.
-
Apply four cylinders and transform them to the four corners as poles that will hold the battering ram later.

-
Individually set their pivots to the Middle - Upper Center of them so that the pivot points are able to be attached to the ropes
for carrying the log.

-
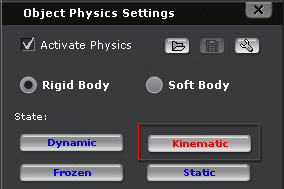
Select them and set them as Kinematic rigid bodies via the Object Physics Settings panel (Shortcut: Shift + F9).
-
Attach the four cylinders to the platform so that they will move along with the vehicle as parts of it.

Mounting the Swinging Log
-
Transform another cylinder to act as the swinging log of the battering ram.

-
Apply two simple props as the joints that will hold the log. Set their pivot points to their respective top points.

-
Set the log and the two joints as Dynamic rigid bodies.
-
Apply Slider constraints to the joints. Lock their X axes by setting the (Min, Max)
to (0, 0) and pick the log as their common target. This step
ensures the two joints to be firmly fixed to the log.

-
Select the front joint and apply two Rope constraints to it.
Respectively pick each of the front poles as the target.
-
Repeat the same step with the rear joint. The log will then be held by the four poles.

-
In order to make the ropes stiffer, you need to adjust the settings
of the four rope constraints as shown below:

-
Click the play button in the control panel. The log is carried by the vehicle with inertia movements.
Adding Pushing Force to the Log
Although the battering ram has been mounted onto its trolly, you are presently unable to apply direct force to it other than its natural swinging momentum.
By applying a push force from the L1 Force category of the Physics Toolbox, you are able to apply a propelling power in any
desired direction.
-
Apply the Push dummy from the L1 Force category of the Physics Toolbox. The corresponding control tile panel will
display on the 3D viewer.

-
Open the Advanced Panel of the control tile panel.
-
Pick the log as the controlled object. Close the advanced panel.

-
Move the arrow to the center of the structure.

-
Attach the arrow to the platform of the structure. This step ensures the
pushing force will be identical to the direction of the log.
-
You may now use the control panels to move, rotate the entire structure and then
give pushing force to the log to attack any other physics rigid bodies.


