| Steps
:
 A.
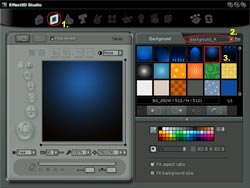
Select a background image A.
Select a background image
- In the Main Navigation Bar click the Select Background
button to step to the background page.
- Select the Background-A category from the Background
Category pull down menu.
- Click to select the BG_A5 thumbnail displayed
in the Background Gallery.
 B.
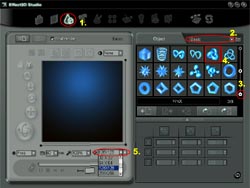
Import a 3D object B.
Import a 3D object
-
In the Main Navigation Bar, click the
Select Object button to step to the 3D object
page.
-
Select the Basic category from
the Object Category pull down menu.
-
Scroll until the Knot object is visible
in the Gallery.
-
Click to select Knot thumbnail
to highlight the 3D object in the gallery.
-
Change your project size to 128x128.
 C.
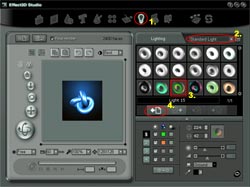
Apply a lighting effect C.
Apply a lighting effect
-
In the Main Navigation Bar, click the
Lighting Effect button to step to the lighting
effects page.
-
Select the Standard light category
from the Lighting Category pull down menu.
-
Click the light 15 thumbnail to
highlight the light setting.
-
Press the Apply button to add
the 3D object to your project.
 D.
Apply an animation D.
Apply an animation
- In the Main Navigation Bar, click the Animation effects
button to step to the animation page.
- Select the Simple Movement category from the
Animation Category pull down menu.
- Click the Roll left thumbnail to highlight the
animation sequence in the animation gallery.
- Press the Apply button to apply the animation
to your project.
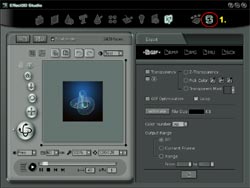
 E.
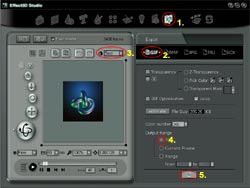
Export as an animated GIF E.
Export as an animated GIF
- In the Main Navigation Bar, click the Export file
button to move the export page.
- To export your result as an animated GIF, select the
GIF tab.
- Set the Anti-aliasing option to Best, ensuring
the highest quality exported file.
- Set the Output Range to All to export the complete
animation sequence.
- Press the Export image file button, a Save As
dialog box will appear, enter aa.gif as the filename and
click OK, your file will begin to render, once complete
the file will open in your default viewer.
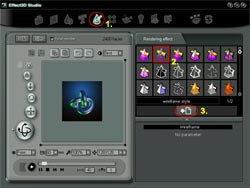 F.
Change a wireframe style rendering effect F.
Change a wireframe style rendering effect
-
In the Main Navigation Bar, click the
Rendering Effect button to step to the rendering
effects page.
-
Select the Wireframe rendering
style.
-
Press the Apply button to update
the changes to your project.
 G.
Adjust the Image Effects setting G.
Adjust the Image Effects setting
-
In the Main Navigation Bar, click the
Image Effects button to step to the image processing
page.
- Press the Tone tag.
-
Set the background Brightness property
to a value of 50.
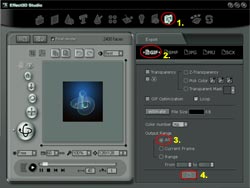 H.
Export as an animated GIF H.
Export as an animated GIF
- In the Main Navigation Bar, click the Export file
button to step to the export page.
- To export your result as an animated GIF, select the
GIF tab.
- Set the Output Range to All to export the complete
animation sequence.
- Press the Export image file button, a Save As
dialog box will appear, enter bb.gif as the filename and
click OK, your file will begin to render, once complete
the file will open in your default viewer.
 I.
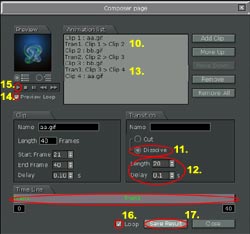
Merge animated GIF files I.
Merge animated GIF files
- In the Main Navigation Bar, click the Animation
composer button to step to the animation composer
page.
- Press the Add Clip button to load the first
and second images you created (aa.gif, bb.gif, aa.gif
and bb.gif).
- The 4 loaded clips will be visible in the Timeline.
- Highlight Clip1 in the Animation List.
- Set the end frame to a value of 20.
- Highlight Clip2 in the Animation List and set the
end frame as 20.
- Highlight Clip3.
- Set the start frame to a value of 21.
- Highlight Clip4 and set the start frame as 21.
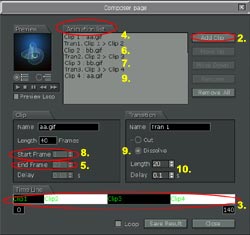
- Highlight Tran1.
- Set the transition mode to Dissolve.
- Set the Length parameter to a value of 20 and
Delay to 0.1
- Highlight Tran4 and set the Length parameter to a
value of 20 and Delay to 0.1.
- Check the Preview Loop option.
- Click the Play button to view the animation
in the preview window.
- Set the Loop option to loop the exported file.
- Click the Save Result button to export your
new animation file.
|

 In this tutorial, you will learn: