-
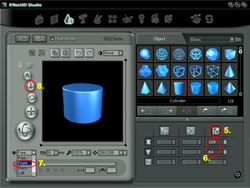
In the Main Navigation Bar, click the
Select Object button to step to the 3D object
page.
-
Select the Basic category from
the Object Category pull down menu.
-
Click the Cylinder thumbnail
to highlight the object in the gallery.
-
Press the Apply button to add
the 3D object to your project.
-
Click the Scale Object button.
-
Select X & Y parameters, change
values to X=106 and Y=64.
-
Change the camera view to the Front
view.
-
Use the
Zoom Camera control to
enlarge the 3D object so it fills the preview window.
-
In the Main Navigation Bar, click the
Rendering Effect button to step to the rendering
effects page.
-
Select the clay rendering style by clicking
the Clay thumbnail.
-
Press the Apply button to apply
the changes to your project.

 In this tutorial, you will learn: