Steps:
 A.
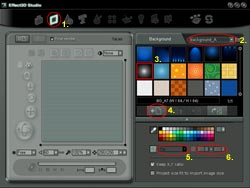
Tile a background image A.
Tile a background image
- In the Main Navigation Bar click the Select Background
button to step to the Background page.
- Select the Background-A category from the Background
Category pull down menu.
- Click to select the BG_A7 thumbnail displayed in
the Background Gallery.
- Press the Apply button to apply the image to your
project, changes you make to your project will be visible
in the Preview Window.
- Set the background mode to Tile.
- Adjust the number of tiles used to X=4 and Y=3.
 B.
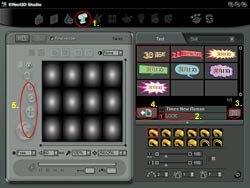
Type 3D text, set font style and text position B.
Type 3D text, set font style and text position
-
In the Main Navigation Bar, click the
Select Text button to step to the Text page.
-
In the Text Box type LOOK.
-
To change font style, press the Select
Font button. This will open a window with a list of
available fonts and font styles. Select Pagoda SF
font and then click OK.
-
Press the Apply button to add the
3D text object to your project.
-
Use Zoom, Roll, Move,
Rotate to adjust the text position.
 C.
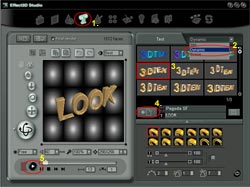
Apply an animation template C.
Apply an animation template
-
The text templates supplied with Effect3D
Studio enable you to create dramatic looking 3D text images.
-
Select the Dynamic category from
the Text Category pull down menu.
-
Click the thumbnail of the fourth animation
in the gallery.
-
Press the Apply button.
-
Click the Play button located in
the Animation Control Bar, this will begin to animate
your text in the Preview Window.
 D.
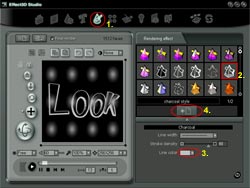
Apply the charcoal effect D.
Apply the charcoal effect
- In the Main Navigation Bar, click the Rendering Effects
button to step to the Rendering Effects page.
- Select the charcoal rendering style by clicking the Charcoal
thumbnail
- In the advanced properties, set the Line Color
parameter to gray.
- Press the Apply button to apply the changes to
your project.
 E.
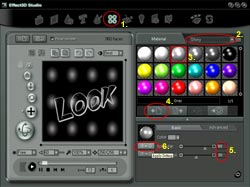
Adjust material settings E.
Adjust material settings
- In the Main Navigation Bar, click the Material Effects
button to step to the Material page.
- Select the Shiny category from the Material Category
pull down menu.
- Click the Gray material in the gallery.
- Press the Apply button.
- Set the Specular property to a value of 80 and
Glossiness property to a value of 30.
- Press the Apply Setting button to apply
the changes to your project.
 F.
Apply a shadow F.
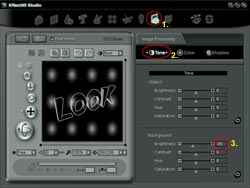
Apply a shadow
- In the Main Navigation Bar, click the Image Effect
button to step to the Image Processing page.
- Select the Tone tab to view the tone properties.
- Change the background Brightness value to 30 using either
the slider or typing the value.
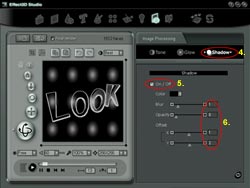
- Select the Shadow tab to view the shadow properties.
- Turn the shadow on by checking the On/Off box.
- Set the shadow properties to the following values: Blur=1,
Opacity=0, Offset X=1 and Y=2.
 G.
Export as an animated GIF G.
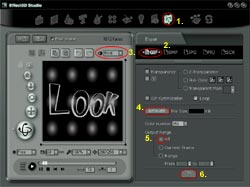
Export as an animated GIF
- In the Main Navigation Bar, click the Export file
button to step to the Export page.
- To export your result as an animated GIF, select the GIF
tab.
- Set the Anti-aliasing option to Best, ensuring
the highest quality exported file.
- To estimate the export file size, click the Estimate
button.
- Set the Output Range to All to export the complete
animation sequence.
- Press the Export image file button, a Save As dialog
box will appear, enter a filename and click OK, your file
will begin to render, once complete the file will open in
your default viewer.
|

 In
this tutorial, you will learn how to:
In
this tutorial, you will learn how to: