AML ScriptEditor is an official developer tool for iClone content creators to increase the user productivity with interactive content. Since iClone3 actors and iProps are preset with smart controls, AML ScriptEditor allows users to create custom iContent (which means interactive content like: Personal, iProp...) more easily.
Smarter mechanism to speed up your filmmaking process when dealing with complicated prop & character interactivity.
Easier graphic UI to create interactive scripts without heavy programming knowledge.
Faster learning curve with templates, operation guides and tutorials.
Note. Please upgrade to iClone 3.2.1230.1 before you utilize the tool.
For iClone 3 only.
What Interactive Content you can do with AML ScriptEditor
AML ScriptEditor results in AML files. Each AML can be used to describe one object only, and it's composed with two major parts: Command & ClipSeq (Clip Sequence). There are 4 types of Command: Idle, Perform, Move, Operate, and 7 types of ClipSeq.
Idle
Move
Perform
Operate
Idle Command
When the avatar or prop is not directly being interacted with, the avatar will run idle commands. Each character or prop is also allowed to contain more than one idle motion. Idle movement will happen when you "play your project or record in Director Mode".
None
1 Idle
3 Idles
Move Command
When the animator wishes to create the animation of the avatar or prop walking, running or flying, without spending much time, the user can use the preset move commands without much expenditure of time. "The universal game controls of W, A, S, D keyboard controls" will remove the gap of learning how to move your characters in scene.
Perform Command
Quick, easily accessible animation and action sequences are performances. Animators who are familiar with interactive animation and real-time filming will greatly appreciate built in performances. Animations and other actions are collected and accessible by "the use of hotkeys (e.g. 1, 2, 3, ......)".
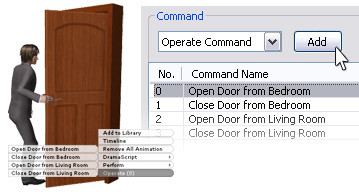
Operate Command
Various interactions between avatar and props or vehicles are operations. The animation is embedded into the prop itself; therefore any avatar will be able to interact with that prop. Operate commands are very easily accessed by "the use of right-click menus".
Sample Projects & Resources
To help you understand more about AML & the possible of interactivity, Reallusion provides 20 sample projects to clarify the ideas about AML. You can view the related documents, videos and get access to detail AML library in iClone Wiki.
Project Name
Description
Get Resource
Avatar_Breath
Idle commands are important to help speed up the stand-by animation process for characters that are not directly in the animation. In this lesson, we will isolate one idle command and Animation Clip to learn the basics of idle. This sample shows you how to add a breathing idle animation to character.
Prop_Idle
This sample shows you how to add an idle animation to a prop, in this case, a rotating box that was created in 3DS Max. This lesson will demonstrate how one Idle Command works with a pre-designed Animation Clip.
Avatar_Idles
Now we know the basics about one Idle Command, let's design a complete Idle Command designed for an avatar. This lesson shows you how to assign three different Idle Animation Clips to one character, and set the probability for each Animation Clip to display randomly.
Sample_Transform
Certain animations kicking or walking have transform built into the Animation Clip. The designer can choose if the Animation Clip will cause the character to remain in the new position defined by the Animation Clip, or if the character will revert back to the position it was in prior to the Animation Clip.
In this project you can test 2 perform commands both of which has the same animation clip. The 1st perform command's animation clip is set with SampleTransform = None, which means the character will move back to the original root once the motion is played. The other one is set with SampleTransform = Snap, which means the character sample the root location from the performed motion, the next motion starts from the sampled root location.
Avatar_Attack
This lesson is going to show how a character can perform Animation Clips by pressing hotkeys.
There are two perform commands with one animation clip each. The hotkey has the setting as 'perform1' which means the character will play the attack motion once button 1 or button 2 is pressed in the Director Mode.
Note: LockPerform in Perform Command dictates if there interruption is allowed or not during the Animation Clip. For example, as the 1st perform 'Punch' is playing it could be interrupted by another perform by pressing another hot key. However, 2nd perform 'Kick' would not since it has LockPerform on, thus the Animation Clip will be played completely without interruption.
Prop_Open_The_Chest
This lesson teaches how to collect clip (creating your own animation inside of iClone) and then use that animation you created to open or close the cap of a treasure chest. This lesson also serves as a refresher lesson for hotkeys and right-click menus.
It has two different perform commands, and you could use the right mouse button (in Editor Mode and Director Mode) or hotkeys (in Director Mode).
Avatar_Performs
This lesson shows how a character can perform 3 different motions in a defined sequence by only pressing one hotkey.
This lesson has 3 clip sequences all within one perform command. The 2nd and 3rd Animation Clips has been given a sequence which uses the 1st and 2nd Animation Clips as the Trigger Clip. That means the 2nd motion clip would be trigged to play immediately after the 1st motion clip has played. And the 3rd Clip will be played once the 2nd motion clip has completed its animation.
For the Perform Command, you will set the hotkeys and then you execute them via the keyboard while in Director Mode inside of iClone.
Prop_Performs
This lesson shows how to arrange animation clips in different sequences by using Trigger settings. Make sure you read through Avatar Performs because that lesson will give you some basic introductions to Trigger Clips and this lesson will give you more knowledge on the design of Trigger Clip arrangements.
This lesson has two perform commands with the same set of Animation Clips, the only difference is the Trigger Clip settings. Different Trigger Clip arrangements will cause the Animation Clips to perform in different orders.
Avatar_Any_Angle
This lesson will show you how the character can move to a prop (by selecting the prop and tell it to have the avatar to move to the prop). This lesson also introduces the new command structure called Operate Commands which are commands that are in props which dictates to the selected to Avatar to interact with the prop.
This lesson only has one Operate command, and the AML is designed into the prop.
Avatar_posHelper
In this lesson we will go a step further than the lesson Any Angle and you will learn how to move a character to a specific position relative to a prop using Position Helpers (referred to as: posHelper). The character will approach the posHelper than interact with the prop from the location of the posHelper.
This is good when you consider the uses of posHelper. Unlike props like soda cans where you can approach from Any Angle, you can only interact with a car's door at the position of the car door. So in this lesson, we discuss the following:
There are three different Operate commands, and each has its own posHelper.
The operate command is stored in the parent node, and it has 3 sub-node attached as the PosHelpers.
Avatar_Open_the_Door
This sample shows how a character can open a door by combining the knowledge we learned from the lesson of Avatar posHelper and the basics of operate commands.
This lesson has four operate commands, two of them are open/close the door by pulling the door open and closing the door by pushing all from the same posHelper.
Stationary_Rotation
This lesson shows how to do a simple stationary rotation using move commands in Director Mode. This is a simple lesson, but the major foundation lesson for learning other move commands.
It has only one move command; the move command is a simple rotate left and right called StationaryLRTurn.
Forward_Rotation
This lesson teaches rotation (left/right turn) while the prop is moving forward. You will also learn about speed of movement and how speed can effect rotation angle. By combining movement forward, rotation as well as speed, we can effectively create a curve.
The lesson only has one move command with selected type of "ForwardAllTurn".
Motorcycle Movement Animation
This lesson shows how to use move commands with predesigned animation clips in the prop. When the motor bike moves, the wheel rolls, and when it does left/right turns, then the bike will tilt to the corresponding side. You can also learn how to set the speed as well as increase and decrease acceleration when you start and stop the move command.
In this case, the motorbike, (a 3D Live Prop) is designed and exported from 3DS MAX, it does not need to assign any Animation Clips since and all the animation has been pre-embedded.
Avatar_Persona_All
(AML for the Character)
This is all the lessons combined into a final design for an avatar. It includes Character Movement, Idle, Perform, and Performances while the character is moving.
This sample includes a complete persona and commands - 4 types of idle, 6 move directions, and 5 types of performances.
Each idle command would be played base on the settings of its OccurTime.
The move commands contains 3 modes for character movement: Walk, Run and Fly. This character can move in all directions (front, back, left, right, up and down), and she even rotate left or right while standing still.
This project also contains the sample of deactivate terrain snapping to enable the character to fly off the ground, set ground collision detection so she can not penetrate the ground, and resume her terrain snap attribute so she can land on the ground.
The perform commands could be played once the hotkey has been pressed, it has 5 kinds of performances. And you can use number key 1 to 5 to activate them.
You can activate Perform 2 and Perform 5 while in movement, ie. punch while walking, or wave the character¡¦s right hand while walking. This shows how you can combine partial upper body action while the lower body is in movement.
In this project, the character can pick up the box based on the Operate command embedded in the box. As for carrying the box, the character can walk around with the right arm ¡§persisted¡¨ in the position of holding the box status, and resume to its original swinging-arm walking motion, please see the sample below - Avatar_Persona_All_Props.
Avatar_Persona_All_Props
(AML for the Object, in this case, box)
Object Interaction, Persist the specified character motion while holding the box, Desist to resume to the character to her original animation.
This sample is the product box which is used in Avatar_Persona_All as the operated prop.
To take the box, it has two animation clips which are 1)Taking the box and, 2) Holding the box with the character's hand and linking the prop to the character.
To drop the box, it has two animation clips which are 1)Holding the box with the character's hand and then drop it and 2) unlink the prop from the character and align the prop to the terrain.
Note: The motion clips are the same and you just need to exchange the animation to the prop you want the character to interact with.
Elevator_Up_Down
This sample shows you how to make an elevator, which you can command the actor to get into the elevator, and you can use hotkeys to move the elevator up and down, and then ask the character to move out
For the Operate commands (Use/Leave), it has one align clip and one link clip to move the character to get in the elevator; and it has one unlink clip and one align clip to move the character to leave the elevator.
For the Move commands (Up/Down), it is using two different commands. Both of them could be controlled by right mouse button and the hotkeys as well. (Shift-Q for down, Shift-E for up).
Switch Particle Effects
This lesson shows how to better control effects by using a prop as the parent to the particle effects. You will learn how to switch 3 particle effects by using hotkeys (1-6), and how to switch the effects off by hotkey (6), and the duration time of each particle effect
It has 6 different perform commands, and you could trigger each particle effect by hotkeys 1 to 3. Number 4 is a sequential playback of all 3 effects, Number 5 = play all effects together, 6 is the off setting to stop all effects.
Each effect could set its duration separately
Grab_and_Drop
This lesson shows how to make the character grab a soda can, and then drop it (snap the soda can prop back to the ground)
To grab the soda, it takes one animation clip for the character to grab the soda, one animation clip to keep the character holding the soda, and one LinkClip to keep the prop in the hand (link to hand).
To drop the soda, it takes one animation clip for the character to drop it, one UnLinkClip to remove the link between the soda can prop and the character, and one AlignClip to align the prop back to terrain.
Note: you can change any prop you want the character to grab and drop by using this same operation script.
Switch_TV
This lesson teaches you how to switch the TV channels by hotkey control by using image planes and visibility settings. You can use this lesson to learn the functions of visibility.
This lesson has 3 perform commands, each assigned to one image plane. Each image plane has its own textures. Channel 1 and 2, are animated textures simulating a TV program and 3rd one is a texture simulating the power off state of the TV.
The Visible clip is to control which image plane (channel) is going to be viewed by means of using hotkeys.
Persist_And_Desist
This lesson shows how to persist the last pose of an Animation Clip, and then desist that pose after you pressed the hotkey.
The Animation Clip in perform command 1 has the priority, and you can check the persist settings. The last pose of the animation sequence of the character will remain after the animation is played.
The desist will return the character back to the normal status which in this case- randomly playing idle motions.
Take Actions
Share & discuss your experiences
with other users about iContent
Create & submit your iContent to
make money in Developer Center


 AML ScriptEditor is an official developer tool for iClone content creators to increase the user productivity with interactive content. Since iClone3 actors and iProps are preset with smart controls, AML ScriptEditor allows users to create custom iContent (which means interactive content like: Personal, iProp...) more easily.