1
Main Track
2
Sub Track
3
Cut/Copy/Paste/Delete
Cut: Click the Cut button to cut the target key, or clip, and add into the clipboard.
Copy and Paste: Click on the copy and paste button, or use hotkey Ctrl + C on selected keys or clips to copy. Use Ctrl + V to paste to the target frame (single or multiple keys).
Delete: Click on the Delete key or Delete button to delete highlighted keys or clips.
4
Zoom in/out
Actual size
Fit window
Click the Zoom in/out buttons to increase or decrease the time (cell) unit size.
Click the Actual Size button to show the time unit represented as 60 frames per second.
Click the Fit window button to view the entire timeline items within the timeline window space.
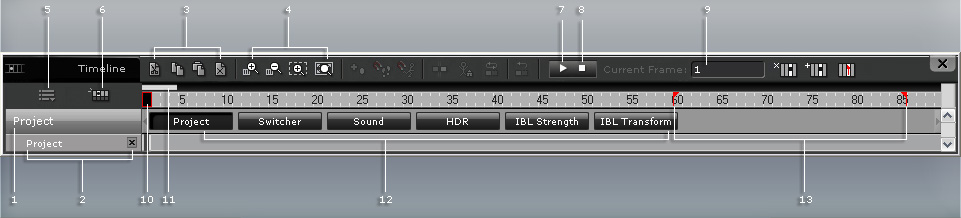
5
Track list
Click the Track list drop-down list and select the items, and their Group buttons, you wish to show/hide on the Timeline.
6
Object-related track
When you pick an object in the 3D viewer with this button activated, the Timeline will only display the tracks of the picked object.
7
Play / Pause
Click this button to play the current project and view the results; click again to pause playback. (Shortcut Key: Space Bar)
8
Stop
Click this button to stop playing and jump to the start frame of the project. (Shortcut Key: ,)
9
Current Frame
This field shows the current frame number when you click on the target frame in the timeline. You may also type in the frame number to jump to the target frame. This allows you to go to any precise target location. This is especially convenient for animation with clear timing control.
10
Display Bar
The features of the display bar:


11
Time Pointer
The time pointer updates the status of the project in the 3D preview window. You may drag it to view frame by frame effects.
12
Grouped Sub Track Buttons
Click these buttons to show/hide the grouped sub tracks of the picked object.
Group Button Status:
-
 - Show all or some of its sub tracks.
-
 - Hide all of its sub tracks.
Group Buttons Containing Multiple Sub Tracks:
- Motion: Motion, Motion Layer, L Hand and R Hand tracks.
- Face: Viseme, Expression and Facial Layer tracks.
- Reach: tracks for each body parts.
- Constraint: Look At, Path and Link tracks.
- Material: Material and UV tracks.
13
Playback/Render Range
Drag the two marks to define the range for playback or
rendering.
