If the picture is not straight you will need to correctly define the angle of
the image. Use the Crop
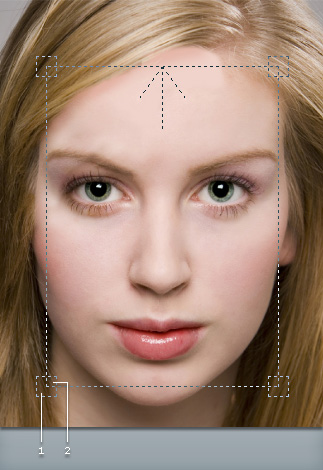
![]() tool to frame
the outline of the face with the arrow pointing to the top of the head. Draw the
rectangle around the face and drag the corners with the mouse to rotate it. Use
the guide in the upper right corner to see how to properly correct a tilted
head.
tool to frame
the outline of the face with the arrow pointing to the top of the head. Draw the
rectangle around the face and drag the corners with the mouse to rotate it. Use
the guide in the upper right corner to see how to properly correct a tilted
head.

|
Note:
|
|
|
Click point 1 to rotate. |
|
Click point 2 to resize. |
When your face is properly framed with the rectangle, click the check mark
 button. Click the abort
  button to abort.
|
Tip:
|
Use the buttons on the left-side toolbars to rotate or flip the image, or adjust the color balance or contrast settings.
When your image is properly edited, click the Next  button to proceed to the next stage,
setting the facial boundary.
button to proceed to the next stage,
setting the facial boundary.