The content manager and the scene manager are contained in the panel on the left of the screen. You may show/hide the whole panel by clicking the triangle in the middle of the right border of the panel or drag the border to adjust the panel to your chosen width. Click the button in the upper-right corner of the two managers to collapse/expand them individually.
The content manager is used for managing the various iClone 3D files including models, animations and contents associated with a project.
Contents are displayed as tiles by default, but contents can also be displayed as
listed icons or thumbnails. Click the content display  button to cycle through the content display options.
Click the list category headers to sort the content by File Name, Size or Modify Date for quick
access to content selection.
button to cycle through the content display options.
Click the list category headers to sort the content by File Name, Size or Modify Date for quick
access to content selection.
Clicking on the Modify Time header to sort content can help you find recently added contents more easily.


In most cases the content manager has two tabs, Template and Custom. The Template tab contains all the predefined content. The Custom tab contains all the custom content you have created with iClone and saved to the various Custom asset libraries.
The Content Manager changes according to the current mode. For instance, if you click the Project tab to enter project mode, the Content Manager/Template tab displays the project template files. Double-click a project template to apply it. The Custom tab contains all the projects that you have previously saved.
Overwrite, Add and Apply

The 3 buttons below the content manager
|
1 |
Overwrite |
Select an item then click the Overwrite button to replace it with the content from the current project. Only content in the Custom tab can be over-written. |
|
2 |
Add |
Add the current content being edited to the Custom tab to save it for later use in any iClone project. |
|
3 |
Apply |
Apply the selected content to the current project. This does the same as double-clicking the content thumbnail. |

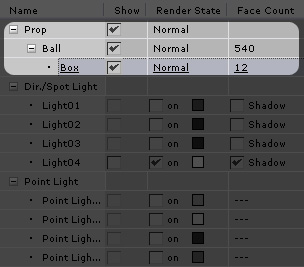
The Scene Manager displays all the objects and actors included in the current project. You may select multiple items, show/hide the objects altogether, or even adjust the render state of them. It also shows the face count of each object for your reference.
Rename Items: Click on the desired object once to select it, click on its name again shortly after to enter the name-editing mode. You may rename all the items as you wish.
Select Items: Click on the items in the Scene Manager to select them. You may press and hold your Ctrl key and click on other items to make multiple choices.
Select Invert: Click this button to invert your current selection (unselects your current selection and selects all others instead).
Hide Unselected: Click this button to uncheck all the boxes in the Show column of unselected objects so these will be hidden in the 3D viewer. This also saves you from un-checking the boxes individually.
Unhide All: Click this button to display all objects in the 3D viewer, and check all the Show boxes of the objects in the current project.
|
Note: |
|
Some items such as water, trees, grass, particle emitters, terrains can not be selected or are difficult to be selected from within the 3D viewer. Use the Scene Manager panel instead to select them easily. The Scene Manger will also show the parent/child node structure of a 3D object so you can use this behavior to select the child node directly.
The Show/Hide status of each item will be saved to iClone project files. |