Setting Extended Bones for Auto Spring Effects (New for 5.4)
In iClone, a non-standard character can be given spring effects to
extraneous bones on your character's rig. These bones can be the sub-nodes of the head or any other
bones that are not used for mapping under the root node of the character.
Please note that you are allowed to
turn off the spring effect
of a bone string
using
key-frame editing.
Step 1: Characterizing the Character
-
Load a biped model file with bone-skinned data. The files must follow the
conventions described in the sections below:

-
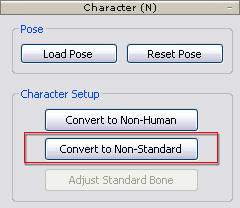
Go to the Character section of the Modify panel
and click the Convert to Non-Standard button.

-
Map the body bones and activate the Active box.

Step 2A: Mapping the Facial Extended Bones
After you map the body bones and select the Active checkbox, the head bone of the character is determined; and all child bones
of the head bone will be initially treated as facial bones. Except the bones that are
mapped as eyes and jaw,
any other additional bones can be mapped as Facial Extended Bones.
-
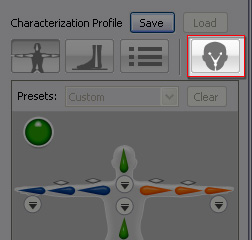
After you activate the bone mapping result as described above, switch to the
Face / Extend Mapping page by clicking the button with a head icon
above the dummy pane.

The modify panel will switch to the Face / Extend Bone mapping mode.

-
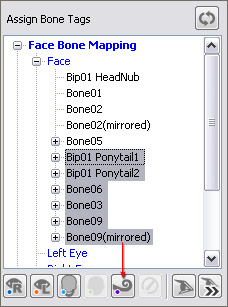
Select the bones that you want to apply
a spring effect to from under the Face node (in blue) and map them as
extended bones (In this case, the ears and the bones that control the mane):

Please refer to the
Setting Extended Bones section for more information.
Step 2B: Mapping the Body's Extended Bones
After you map the body bones and select the Active checkbox, some spare
bones you may still see some extraneous bones in your character's rig. These bones thus can be mapped to the
Body Extended Bones category to apply further spring effects.
-
After you activate the bone mapping result as described above, switch to the
Face / Extend Mapping page by clicking the button with a head icon
above the dummy pane.

The modify panel will switch to the Face / Extend Bone mapping mode.

-
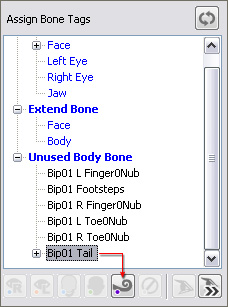
Select the bones that you want to apply
a spring effect to from under the Unused Body Bone node (in blue) and map them as
extended bones (In this case, the tail bones):

Please refer to the
Setting Extended Bones section for more information.
Step 3: Applying Spring Effects to Extended Bones
After the model is converted into a non-standard character, you can start to
apply spring effects to the extended bones.
-
Scroll to the Spring section and click the Edit Spring
button.

-
The Modify
panel for spring editing mode.

-
Select the extended bones in the 3D preview window and set the spring parameters for the bones.

|

|
|
Facial extend bones.
|
Body extend bones.
|
Please refer to the
Setting Spring Effects
and Editing Spring Groups sections for more information.
-
Click the Apply button to confirm the settings and leave the
spring editing mode.
-
Export (Ctrl + E) the character to iClone. Animate the character
and the
bones that have been given spring effects, and they will automatically and naturally bounce along with the
character's motions.


