 Basic steps – Enhancing the skin Basic steps – Enhancing the skin
The Enhance Skin screen enables you to apply various skin filters and improve the quality of the facial skin. Follow these instructions to perform skin cleaning.
Click ![]() to edit the facial mask.
to edit the facial mask.

Click the Automatic Skin Mask button to edit the facial mask automatically.
Under Area Selection, click Full Image to allow the facial mask to include the entire image and apply the skin filters to all the skin area in the image. Alternatively, click Face to limit the facial mask to be applied only to the face.
Drag the Tolerance slider to change the tolerance intensity of the facial mask.
The Skin Color box displays the average skin color as calculated by the software from the image.
Click the Manual Edit button to edit the facial mask manually.
Under Increase/Decrease
Mask, click the ![]() button to increase the facial mask
area or the
button to increase the facial mask
area or the ![]() button to decrease the facial mask area.
Click and drag the cursor over the image to change the facial mask.
button to decrease the facial mask area.
Click and drag the cursor over the image to change the facial mask.
Drag the Brush Size slider to change the brush size while modifying the facial mask.
Drag the Opacity slider to change the opacity of the brush while modifying the facial mask.
Click the Mask Color box to change the color of the facial mask.
Click Apply to apply the facial mask and proceed to the next step. Red eye is a very common effect caused in photographs due to incorrect flash settings or light conditions. This effect can be reduced using the red eye reduction tool.
Click the ![]() button
to remove red eye effects.
button
to remove red eye effects.

Remove the red eye effect as follows:
Drag the Pupil Radius slider to adjust the size of the pupil (black circular opening in the center of the eye). Selecting the correct pupil area prevents erroneous removal of red parts in the image. Drag the circular pupil markers on the image to adjust the position of the pupils.
Drag the Intensity slider to specify how much eye color to use when removing the red eye effect and the intensity with which it blends with the original color. Use a higher setting if the red eye effect is very strong.
Click the Fill
Color box to select the color that you want to add to the eye pupils.
Select the desired color from the color palette displayed. You can also
add a custom color to the palette by clicking Choose
Custom Color and choosing a color from the color spectrum. Alternatively,
click the eyedropper ![]() under Fill
Color and the cursor changes to a dropper when hovered over the
image. Click to sample the color from the eye in the image and this will
be used to replace the red areas in the original image.
under Fill
Color and the cursor changes to a dropper when hovered over the
image. Click to sample the color from the eye in the image and this will
be used to replace the red areas in the original image.
Click Apply to remove the red eye effect and proceed to the next step.
Click the ![]() button
to apply the following skin filters to the image.
button
to apply the following skin filters to the image.

Check the Smooth Skin box to apply a skin smoothening filter. Drag the Smooth Level slider to change the intensity of the smoothening filter.
Check the Shadow/Gloss
Reduction box to remove bright or shadowy areas from the image.
Click the Shadow button to remove
shadows or Gloss button to remove
excessive gloss. Drag the Fuzziness slider
to determine the area where the filter is applied Drag the Intensity
slider to adjust the strength of the filter. Use the color palette under
Fill Color
to select a fill color to replace the glossy or shadowy areas in the image.
Alternatively, you can use the eyedropper ![]() to sample a color
in the image and use it as the fill color.
to sample a color
in the image and use it as the fill color.
Check the Adjust
Skin Tone box to apply more color tones to your image. Drag the
Tone Level slider to change the
intensity of the skin tone. Use the color palette under Skin
Tone to select a color for adding to the skin in the image. Alternatively,
you can use the eyedropper ![]() to sample a color in the image
and use it as the skin tone color.
to sample a color in the image
and use it as the skin tone color.
Click to apply any one of the 5 skin templates: Smooth, Degloss, White, Pink, or Sun tan. The Smooth Skin, Shadow/Gloss Reduction, and Adjust Skin Tone filters are adjusted using preset values for each effect.
Click Apply to apply the skin filters and proceed to the next step.
Use any of the Toolbox
tools to apply skin filters
manually in desired areas as follows:
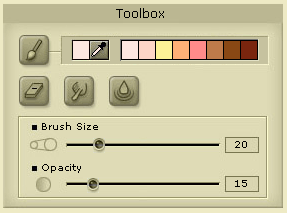
Drag the Brush Size slider to change the size of the brush used for applying a manual skin effect.
Drag the Opacity slider to change the intensity of the skin filter applied.
Use the color palette to choose a color for the desired skin filter.
Use the eyedropper tool
![]() to sample a color from the image and use it for the skin
filters.
to sample a color from the image and use it for the skin
filters.
Click the ![]() button to apply paint to the image. Click and drag the mouse
over the image to apply color manually as desired.
button to apply paint to the image. Click and drag the mouse
over the image to apply color manually as desired.
Click the ![]() button to create a smudging effect on the image. Click and
drag the mouse over the image. The tool picks up color where the stroke
begins and spreads it in the direction of the stroke.
button to create a smudging effect on the image. Click and
drag the mouse over the image. The tool picks up color where the stroke
begins and spreads it in the direction of the stroke.
Click the ![]() button to smooth hard edges or sharp areas of the image and
reduce unwanted details. Click and drag the mouse over the image to smooth
the pimples, wrinkles or other blemishes of the skin.
button to smooth hard edges or sharp areas of the image and
reduce unwanted details. Click and drag the mouse over the image to smooth
the pimples, wrinkles or other blemishes of the skin.
Click the ![]() button if you are not satisfied with any changes that you
have made. Click and drag the mouse over the image to restore the image
to its previous state.
button if you are not satisfied with any changes that you
have made. Click and drag the mouse over the image to restore the image
to its previous state.
Tips:
Click and hold down the ![]() button to view the original picture for comparison. Release
it to view the edited picture again.
button to view the original picture for comparison. Release
it to view the edited picture again.
Click the ![]() button
to return back to the original unedited image and discard all your changes.
button
to return back to the original unedited image and discard all your changes.