Apply 3D object to background, add
transparency map & animated lighting to a 3D object
In
this tutorial, you will learn:
A. Apply a background image
B. Select a 3D object
C. Adjust the light setting and apply the 3D object as a
background image
D. Set the material transparency of the 3D object
E. Add animated lighting
F. Export as an animated GIF
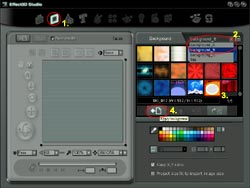
In the Main Navigation Bar, click the Select Background
button to step to the background page.
Select the Background-B category from the Background
Category pull down menu.
Click to select the BG_B17 thumbnail displayed
in the Background Gallery.
Press the Apply button to apply the image to your
project, changes you make to your project will be visible
in the Preview Window.
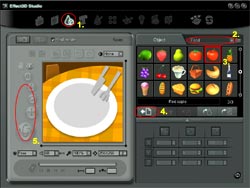
B.
Select a 3D object
In the Main Navigation Bar, click the
Select Object button to step to the Select Object
page.
Select the Food category from the
Object Category pull down menu.
Click the Apple thumbnail to highlight
the object in the gallery.
Press the Apply button to add the
3D object to your project.
Using Zoom, Roll, Move, Rotate
to adjust the objects position.
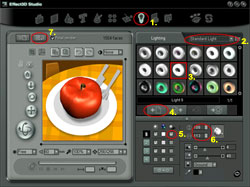
C.
Adjust the lighting setting and apply the 3D object as a
background image
In the Main Navigation Bar, click the
Lighting Effect button to step to the lighting
page.
Select the Standard light category
from the Lighting Category pull down menu.
Select the light 9 setting.
Press the Apply button.
Cast a shadow from light 1 by turning
on the shadow option.
Change the position of the lightsource
by dragging within the preview window of by entering the
position values 108 and 113.
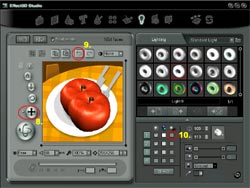
Click the Apply to background button to copy the
3D object and its settings to the background
After applying to background button, you can click the
Move button and drag the object, you will notice
a copy will have been applied to the background image.
Click the Redo button to move the 3D object back
to its original position.
Remove the shadow cast from the light 1 by turning
off the shadow option.
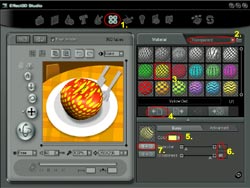
D.
Set the material transparency of the 3D object
In the Main Navigation Bar, click the Material Effects
button to step to the material page.
Select the Transparent category from the Material
Category pull down menu.
Select the Yellow Dot material setting thumbnail.
Press the Apply button.
Click the Set Color button, in the color
panel select the light yellow color.
Adjust the material parameter values to the following:
Specular 1 and Glossiness 98.
Click Apply Setting button to update the changes
to your project.
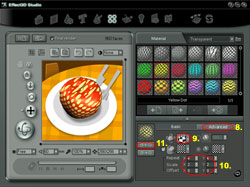
Click the Advance tab to switch to the advanced
setting.
Change the mapping method to Box.
Change the Repeat and Scale values to
Repeat X=4 Y=4
Scale X=2 Y=2
Click Apply Setting button to update the changes
to your project.
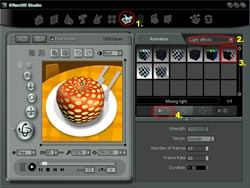
E.
Add animated lighting
In the Main Navigation Bar, click the Animation Effects
button to step to the animation effects page.
Select the Lighting effects category from the
Animation Category pull down menu.
Click the Moving Light thumbnail to highlight the
animation sequence in the animation gallery.
Press the Apply button to apply the animation to
your project.
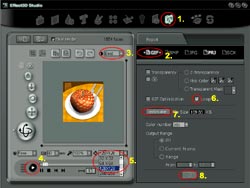
F.
Export as an animated GIF
In the Main Navigation Bar, click the Export File
button to step to the export page.
To export your result as an animated GIF, select the
GIF tab.
Set the Anti-aliasing option to Best, ensuring
the highest quality exported file.
Click the Play button located in the Animation
Control Bar, this will begin to animate your object in the
Preview Window.
Change the image resolution to 128*128.
To loop your animation, check the Loop button.
To estimate the export file size, click the Estimate
button.
Press the Export image file button, a Save As dialog box
will appear, enter a filename and click OK, your file will
begin to render, once complete the file will open in your
default viewer.

 In
this tutorial, you will learn:
In
this tutorial, you will learn: