 Preview Mode you may review facial fittings, eyes, mouth and background mask results.
On the left-side tool bar, the Fitting Mode is pressed as the default button. This helps you fit the feature points to all appropriate locations.
If you wish to change the face image without affecting or re-arranging the wireframes or facial points, then you use the Replace Image feature.
In the Preview Mode you may review facial fittings, eyes, mouth and background mask results.
You may click the
Basic Facial Mode
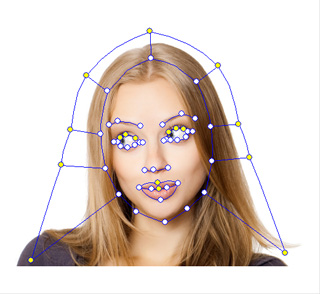
 or Detailed Facial Mode
 button to view the wire frame
around your character. You may also drag the control points, or lines, to fit a character’s face more precisely.
button to view the wire frame
around your character. You may also drag the control points, or lines, to fit a character’s face more precisely.
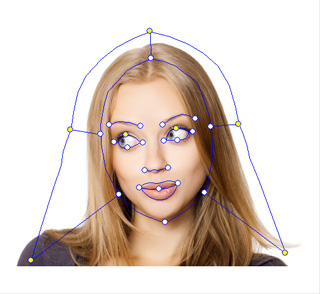
Basic
Detailed
 button and cycle through different wire frame colors.
This can be used if both the original image and the wire frames
colorS are the same color, as it would make it difficult to view and make corrections.
button and cycle through different wire frame colors.
This can be used if both the original image and the wire frames
colorS are the same color, as it would make it difficult to view and make corrections.
 button to pick and move components of the wire frame. This is selected by default.
You may move the wires that connect the frame points, or the individual wire
frame points themselves, by using the mouse to select them. The mouse cursor
changes its appearance once you move over the wire or the wire frame points.
You may also move the frame points along the wires to get a wire shape
more suited to the face contours. To move multiple points simultaneously,
hold the Ctrl key and click the desired
control points. The selected control points will turn red.
Release the Ctrl key and then move
the points to the desired location.
button to pick and move components of the wire frame. This is selected by default.
You may move the wires that connect the frame points, or the individual wire
frame points themselves, by using the mouse to select them. The mouse cursor
changes its appearance once you move over the wire or the wire frame points.
You may also move the frame points along the wires to get a wire shape
more suited to the face contours. To move multiple points simultaneously,
hold the Ctrl key and click the desired
control points. The selected control points will turn red.
Release the Ctrl key and then move
the points to the desired location.
 button to rotate the wire frame or the frame component (wire). To use this tool,
first select a frame component, or a wire, by using the
Select
tool.
The selected wire will turn red. Next, click the
Rotate button.
Hold and rotate the mouse over the image in a clockwise or counterclockwise
direction to rotate the selected frame.
button to rotate the wire frame or the frame component (wire). To use this tool,
first select a frame component, or a wire, by using the
Select
tool.
The selected wire will turn red. Next, click the
Rotate button.
Hold and rotate the mouse over the image in a clockwise or counterclockwise
direction to rotate the selected frame.
 button to adjust the size of the wire frame. To use this tool, first select a frame
component, or a wire, by using the Select
tool.
The selected wire will then turn red. Next, click the
Scale button.
Now position the cursor over the image and drag up or down to increase, or
decrease, the size of the wire.
button to adjust the size of the wire frame. To use this tool, first select a frame
component, or a wire, by using the Select
tool.
The selected wire will then turn red. Next, click the
Scale button.
Now position the cursor over the image and drag up or down to increase, or
decrease, the size of the wire.
 button to close the mouth points of the wire frame.
This will cause the points of the upper and lower lip to
move together as a single line. If your model has a closed mouth, then
we suggest you to use this option. This option is available only
when you select the Detailed Facial Mode.
button to close the mouth points of the wire frame.
This will cause the points of the upper and lower lip to
move together as a single line. If your model has a closed mouth, then
we suggest you to use this option. This option is available only
when you select the Detailed Facial Mode.

|

|
|
Close Mouth Points |
Open Mouth Points |
 button to play back
a short script intended for calibration. Click the down
arrow next to it if you wish to select a specific part of the
face.
button to play back
a short script intended for calibration. Click the down
arrow next to it if you wish to select a specific part of the
face.
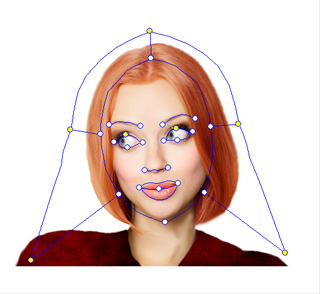
If you have several of the same character with various hair styles and makeup, then you may use this feature to change the image without adjusting the wireframes and feature points.
Click the Replace Image button on the right bottom of the page, load another image. Now the original image will be replaced with the new image, while leaving the wireframes and feature points unchanged.
|
|
|
|
Before being replaced |
After being replaced |
